
However, one thing about gardening that I don’t consider work is when I get to combine woodworking with it. The way I do this is by building projects meant for the outdoors. One of my favorite projects is a fun one I call The Birdhouse Bench. Here’s a couple I made the other day:
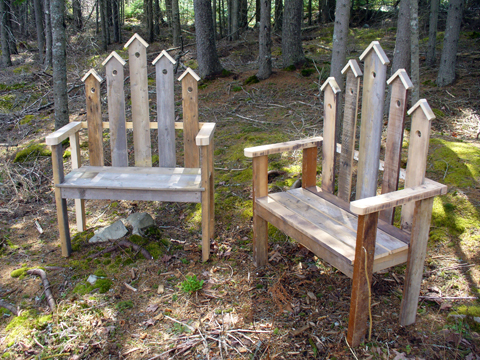
Each one is about 30″ wide, 15″ deep, 40″ tall and made from scrap lumber. They only take a few hours to build and make a great addition to your garden.
Building these benches is a great way to spend an afternoon and to get rid of any scrap 2X’s and 1X’s you may have lying around (old pallets work great too!). There’s no fancy joinery. No tricky techniques. No special tools (though construction is simplified if you use a pneumatic framing gun and brad nailer). Really, there’s no wrong way to do them. They are not fine furniture. They are just a simple, fun project. Here is how I build them:
Cut list:
2 – Seat frame front and back: 1 1/2″ X 2 3/4″ X 30″
2 – Seat frame sides: 1 1/2″ X 2 3/4″ X 12″
4 – Seat boards: 3/4″ X 3 1/2″ X 31″
4 – Legs: 1 1/2″ X 2 3/4″ X 26 1/2″
2 – Armrests: 1 1/2″ X 2 3/4″ X 17 1/2″
1 – Center back board: 3/4″ X 3 1/2″ X 34″
2 – Middle back boards: 3/4″ X 3 1/2″ X 30″
2 – Outside back boards: 3/4″ X 3 1/2″ X 26″
1 – Back support: 1 1/2″ X 1 1/2″ X length from edge of one armrest to the other
Birdhouse roofs: 3/4″ X 1 1/4″ wide with 1/2″ overhang. For length see below.
Rip 2X’s to approx. 2 3/4″ so that they don’t look so chunky. Evenly split 2 X 6 works great.
One end of each of the back boards is cut to a point with 45 degree angles creating a roof peak.
Drill a 1 1/4″ hole centered at about 4″ from the tip of the peak.
For each of the roofs you will need 2 pieces, one for each side of the peak. For the length measure one side from the peak tip to the bottom of the angle and add a 1/2″ for overhang. For the other side take this length and add the thickness of roof, usually 3/4.
The above are rough dimensions only. These can be changed to your desired finished size as well as the scrap you have available. One caveat, if you make the center back board shorter than the size above make the other backboards shorter by the same amount. This will retain the overall angled look of the 5 boards. That being said, there’s nothing stopping you from making each one a random length to give the back a staggered look. Or, you can do one up, one down, one up, etc. Like I said, building these is supposed to be fun. 😉
Steps:
Cut all the wood to size except for the back support.
Nail the 12″ seat frame sides inside the seat frame front and back so overall depth is 15″
Nail top of the seat frame 16″ from bottom of leg
Align the seat boards to seat frame so that the back one is flush with the edge, the front one has a 1/2″ overhang and the other 2 are evenly spaced.
Center the center backboard on the back of the bench, aligning the bottom with the bottom of the seat frame and then nail.
Align the bottom of the outside back boards with the bottom of the seat frame and position it in about 2″ from the legs and nail.
Center the middle backboards between the center and outside backboards, aligning the bottoms with the bottom of the seat frame and nail.
Round the front end of the armrests with a jigsaw or bandsaw. Then nail to the top of the legs ensuring that the back of the armrest is lined up with the back of the backboards.
Measure the length for the back support, cut and nail to the end of the armrests. Nail the backboards to the back support.
To add the roofs to the backboards nail the shorter piece first, aligning it with the top of the peak. Then overlap the second piece over the first piece. If this sounds confusing view the photo above. Likewise, if you are so inclined, you can cut the roofs with a 45 degree miter thereby giving you a more symmetrical look.
You can finish the Birdhouse Bench by painting them if you wish. However, I prefer to leave them natural and let them get that weathered look. Here’s one I did about a year ago:
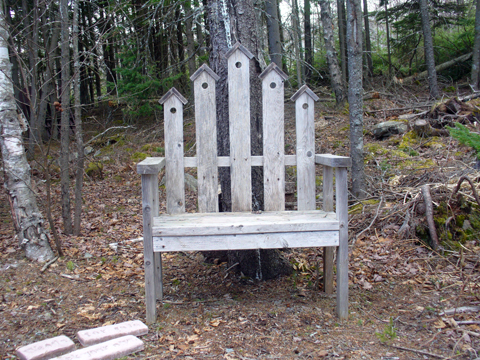
You can see how the natural silver-grey aged look can add to your yard or the garden ambience. If you decide to leave them weather and used any painted boards in the construction I suggest that you rough sand the painted areas.
To date I have built more than a half dozen of these Birdhouse benches. As I said above, they’re a great way to spend an afternoon and to get rid of some old scrap lumber. They also make a great gift for the gardener (the real kind!) in your circle of friends or family. Make one today for him or her and give them a place to sit and ponder the beauty of life… or build one for yourself so you’ll have a place to rest while doing your yard WORK!
Back to the shop…
ED
As I was reading the first part, I was thinking to myself, he should have included the measurements and instructions. Lo and behold you were way ahead of me again!
I’m sure many of your readers will be happy about this.
Woodworker's Guide
Yeah, you’d have to get up pretty early… 🙂
Debra Henderson
Thank you so much for this bench plan. I have really enjoyed making several of them. I have now made several changing the design of the backs, but I still think the bird house one is my favorite. We get left over wood all the time from a friend who remodels fast food restaurants and these benches gave me a use for the short 2x’s he brings me. Thanks again, Debra
Woodworker's Guide
Wow, Debra, thanks for letting me know that this was a help to you! Send me some photos, I would love to see them!