We know (and boy, do we know!) that it can sometimes be a bit intimidating to get started on a new hobby or venture, especially when dealing with technology, unknown terms, secret handshakes and what seems to be a huge learning curve. We have found that if you take it step by step, don’t sweat the small stuff and work at it a little at a time you can overcome these small hurdles. Keeping this in mind, in no time you’ll be caching with the best of them!
This article is in no way meant to be all encompassing! It is meant as a primer only. There are so many cool tricks, tips and nuances with this sport to be dealt with in this one article. We hope that it is at least enough to get you started. From then, the more Geocaching you do the more familiar you will become with the finer points.
So let’s start Geocaching!
Get A GPSr
Although you can go Geocaching without a GPSr it will be much harder to do unless you know the area extremely well and skilled with tracking. So, first, you will need a Global Positioning System receiver. A GPSr is a hand-held electronic device that is used to navigate to a Geocache. They come in a wide range of types and styles with a variety of features. You can find tips on buying a GPSr here.
Once you have your GPSr take some time to learn how to use it. Read the unit’s manual. Get familiar with it. If you like more information there are quite a number of books available on how GPSr’s work and how to use them for Geocaching. The ones we found most helpful were “Geocaching: Hike and Seek with Your GPS” by Erik Sherman and “GPS Made Easy: Using Global Positioning Systems in the Outdoors” By Lawrence Letham. These and other great books on the subject are likely available from your local library or if you prefer to own them they are also available here.
Join geocaching.com
Geocaching.com (GC) is the largest Geocache listing site where information and the co-ordinates of hundreds of thousands of available Geocaches can be found. By becoming a member you will have access to this extensive database. There is also a vibrant Geocaching community centralized around the message forums which is a great resource. The basic membership is free and offers more than enough benefits to get started. You can upgrade anytime to a paid membership which offers many more features. You can create a free Geocaching account here.
Search Geocaches in your area
Once you have your account set up you can search for Geocaches in your area by entering your zip or postal code in the form on the top-right corner of GC’s homepage. Likewise, you can click the “My Account” link and then click the ‘Hide & Seek A Cache’ link on the left-hand menu or you can click the “Search for nearest caches from your home coordinates” link on the right-hand menu if you have entered your home coordinates on account setup. If you have not set up your home coordinates, this is a good time to enter them by clicking the “Update home coordinates” link. Also, by having your home coordinates entered will ensure that new cache listing notifications are accurate for your area. (You get your home coordinates from the reading on your GPSr when you turn it on at home.)

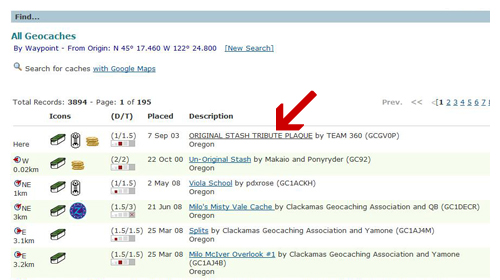
The search results page will show a list of available caches sorted by the nearest to your home location. It also shows the cache type, size, difficulty and terrain (D/T) ratings. Hovering your mouse over the various icons will usually explain what they are.
Click the description link to access the Cache Information for a particular cache.
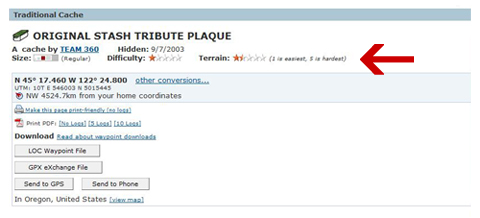
Once on the Cache Information page, near the top, you can again check the size of the cache, the difficulty and terrain ratings, where 1 star is easiest and 5 stars are the hardest.
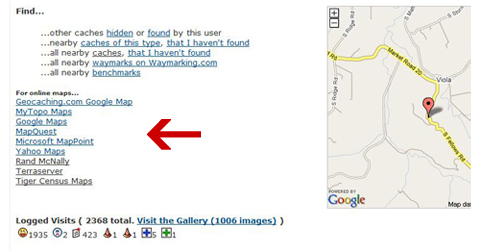
For your first caches it is best to choose large ones and those that are in a park or on a trail. Large caches are easier to find and staying away from heavily populated urban areas will allow a more relaxed search and you will have less of a concern for muggles. You can view a map of the cache locations by clicking one of the ‘online maps’ links on the Cache Information page just above the Logged Visits section.
Enter the cache in to your GPSr
Once you have decided on the caches to search for the next step is to get the coordinates into your GPSr. You’ll find these near the top of the Cache Information page. You can enter these manually according to your specific GPSr instructions. However, the preferred method is to download them directly into your GPSr. The software that came with your GPSr should allow you to do this easily.

You can find out more about downloading coordinates and available software options here at Geocaching.com
If you have a Garmin GPSr the easiest way to download individual caches is simply by clicking the ‘Send To GPS’ button on the Cache Information page. To use this method you will need to install the Garmin Communicator Plugin.
This step can possibly be the most confusing and frustrating step for the new Geocacher. Don’t despair! Take your time.
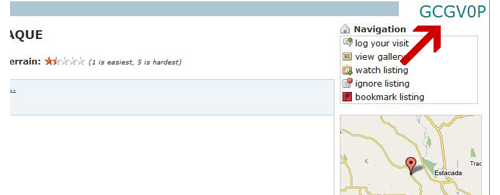
Once you have the coordinates in your GPSr make a note of the Cache ID (upper right corner of the Cache Information page) so it will be handy for logging your find later.
It’s also a good idea to print out the Cache Information page to take with you if you don’t have a GPSr that automatically downloads the cache description, hints, etc.
Plan your hunt
Planning your hunt at this stage is quite simple. If you chose caches close to you and in a park your considerations are minimal. However, as you start doing caches on trails, in woods, further away, etc. your planning will become greater. Dress accordingly, take extra batteries and above all, be aware of the requirement for safety.
Do the hunt!
Once you have followed your GPSr to the cache area now the fun really begins! It is unlikely that you will be directed exactly to the cache. Depending on the accuracy of your GPSr, the accuracy of the Geocacher’s GPSr who hid the cache, weather conditions, nearby trees, buildings, rocks, etc. the cache could be anywhere within a diameter of 2 meters (yards) to 10 meters (yards), or more, of where you are standing. Now is the time to think like a cache – “If I was a cache where would I be hiding…” 🙂 Seriously, using a combination of information from the Cache Information page, available hints and the cache size you can narrow down your search. Look for things that seem out of place, like a pile of rocks or a pile of sticks. Take your time, search methodically. Change your perspective by kneeling down. Look under the brush and in trees. It could be anywhere and some Geocachers have been known to be very crafty with their hiding techniques.
Congratulations on your first find!
Once you have found the cache do the dance of joy! Call all your friends! Treat yourself to an ice cream ’cause you earned it! But before you do make sure that you:
1. Sign the log book
2. If you take something from the cache leave something in return
3. Rehide the cache as you found it
Now go have your ice cream. 🙂
Enter your find on GC
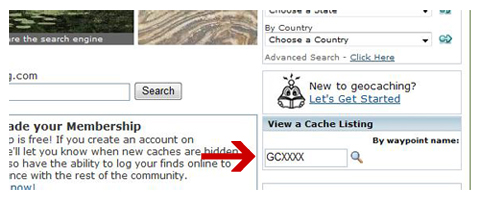
Once you get home log onto Geocaching.com and search for the cache(s) that you found by entering the cache ID number in the search box on the right menu of the homepage.
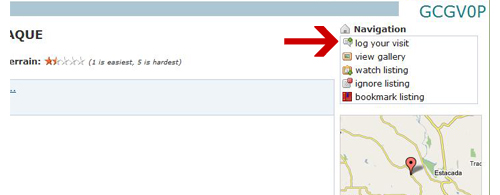
Once on the Cache Information page click the ‘log your visit’ link in the upper-right corner.
On the following page choose ‘Found It’ from the drop-down menu, enter the correct date and a comment about your experience in finding the cache. Then click the submit button.
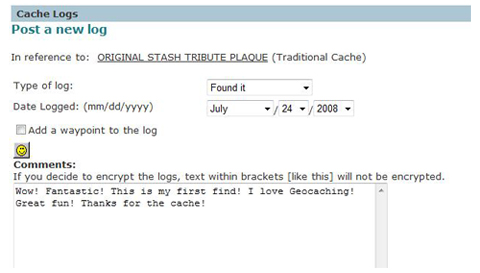
You have just completed your first Cache find! Congratulations again!
Cache more!
While still on GC and after you have entered your finds it’s time start it all over again! Search GC for more caches in your area and get out and do more Geocaching! This is just the beginning of the fun! To enhance your Geocaching experience join a Geocaching club and go to Geocaching events. You’ll meet all kinds of great people interested in Geocaching too! Have fun!
We wish you all the best with your first find. Let us know how you make out. Above all, have fun!
Oh, and remember, if you can’t find it just move on to the next cache on your list. You can always come back to this one when you get a bit more experienced. Do not get frustrated. Even the best Geocachers sometimes get stumped.
Stumped? Did we say “Stumped”? Perhaps it’s in that old tree stump over there…. 🙂
Keep on cachin’!

P.J.
That’s a great tutorial and if anyone ever asks me “How do I start geocaching,” I’m going to just point them to this page!
Ravenview
PJ, thanks for the comment. It’s what keeps us going! 🙂
Cottage Man
Keep it simple, nice job, easy to follow. That will be a handy tool to pass on to new & old cachers.
Thanks
Tracie
what a great introductory article – I’ll be showing it to friends who ask me the “how do I?” question
impsj
I am hoping to start a geocaching program at my college this will help to get me started THANKS!!!
Judy
Im trying to help my son in law with his garmin oregon 300 we can not understand how to get this loaded so he can see where the caches are at. Any help? Where do we go to download the program. It already has a icon in the unit but nothing is there.
Ravenview
Judy, you can find the manual for the Oregon 300 here at Garmin – http://www8.garmin.com/support/userManual.jsp
Scout Mom
Thanks! All the information needed to get started was right here. I think this is something my son’s den will really enjoy doing as the weather permits!
Beverley
I am new to caching. My first two finds today. How does one go about creating a new geo cache?
Ravenview
Beverley, the best place to start would be here on geocaching.com. Good luck! Hopefully we’ll come across some of your caches in the future!