
The Longworth chuck was developed in the late 1980’s by Leslie Douglas Longworth of the Hunter Valley Woodturners in Australia. It features a self centering mechanism that easily and quickly adjusts to the size of your turning.
The concept is quite simple – a pair of disks rotate against each other drawing in, or out, eight rubber ‘jaws’ on a series of opposing arcs. Yep, it’s that simple. 🙂
Here, let me explain how we made ours and you’ll see how easy it is to make one.
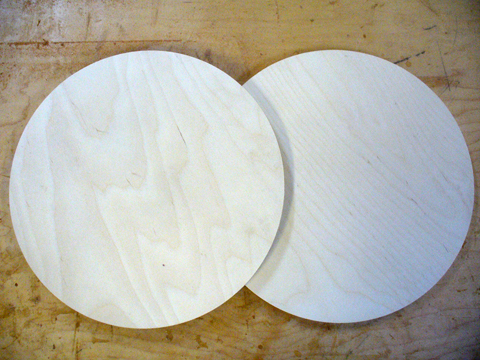
We started with two plywood disks sized to the maximum over bed turning capacity of our lathe. We cut these on the bandsaw using a Bandsaw Circle Cutting Jig
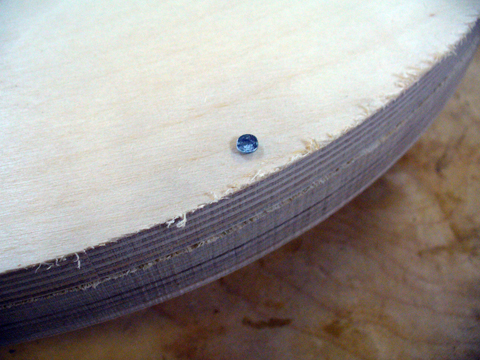
Next, we tacked them together in a couple of places near the edge using some small screws. This is to hold them together for when you route the arcs.
Next, we attached a faceplate to the center of one of the disks using screws that just went only into this one! The faceplate will be permanent so you need to get one specifically for the Longworth chuck.
Once the faceplate is attached to the disks put it on your lathe and turn the disks perfectly round, removing as little wood as possible to maximize the size of the chuck.
Then bring up the tail stock to mark the true center.

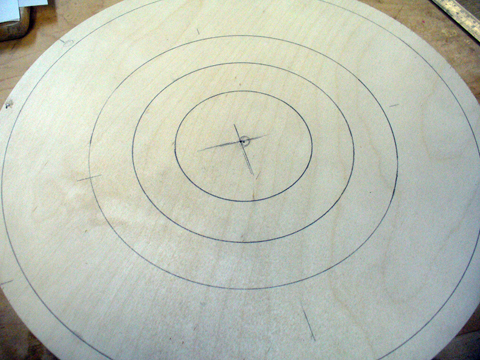
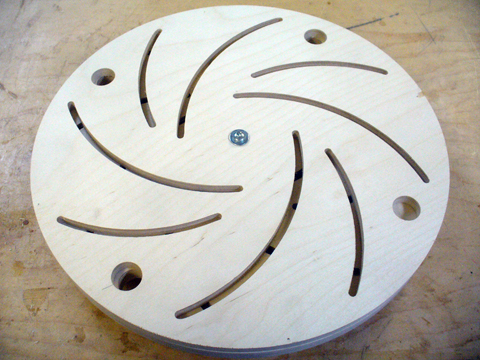
We removed it from the lathe and using a beam compass drew 4 concentric circles. We drew one about 1/2″ larger than the faceplate, one about 3/4″ from the outside edge, one halfway between those and another halfway between the middle one and the innermost one. (note that in the photo the true center of the disks has a small handrawn circle just so that we wouldn’t confuse it with the ‘center’ we used when making the round disks. 🙂 )
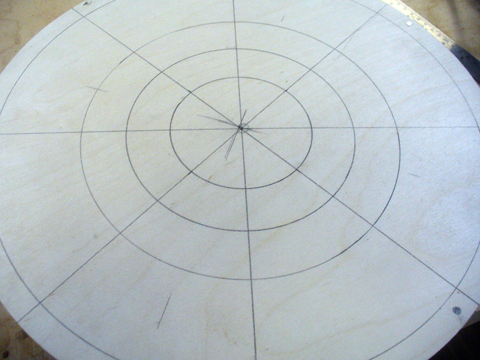
Next, using a ruler we drew a line across the diameter of the disk and then using a protractor we drew a line 90 degrees to this one. Then we drew 2 more lines at 45 degrees to the first one. This made 8 evenly spaced segments:
Then, with the point of a compass on the points where the second circle from the edge and the diameter lines intersect, we drew an arc tangent to the inner circle to a point where they reach the outer circle. This is probably the most confusing part of making a Longworth and is more simply done than read. Hopefully this photo will help:
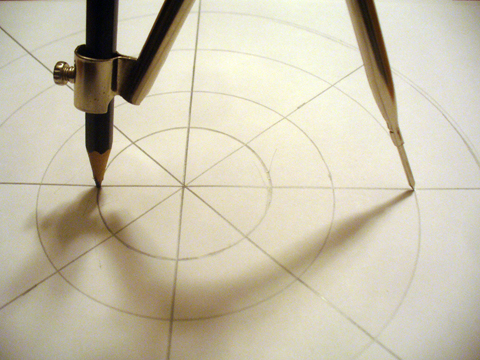
This step first appeared confusing but once the lines were drawn it looked like this:
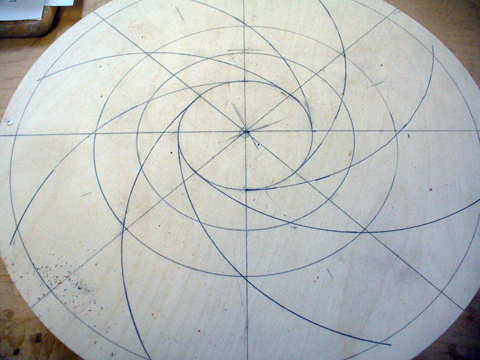
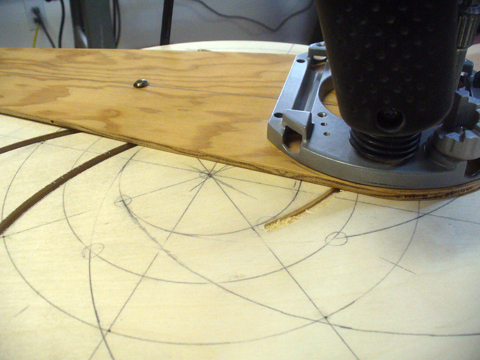
Using a plunge router with a 1/4″ upcut spiral bit and a trammel base we set the pivot point the same as above when we marked it. Then, taking shallow cuts, we cut out the arcs making sure that every second arc only went from the outside circle to the third circle in from the outside. This would ensure that more wood for strength was retained around the faceplate. Marking the starting points ahead of time made knowing which was a long arc and which was a short arc easier.
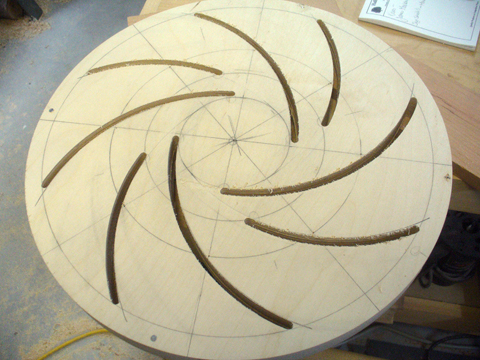
It looked like this when this part was done:
At this point we put it back on the lathe and with a 1/4″ drill bit in a Jacob`s chuck on the tailstock we drilled a hole completely through the center. We also drilled a couple of holes around the very outside edge so that we could use tommy bars to tighten.
Then we took it off the lathe and drilled four 3/4″ holes through both disks about 3/4″ in from the edge and in between the arcs to be used as finger holes for tightening.
Then we separated the disks and took a piece of sandpaper and rolled it into a small tube and sanded the inside of the arcs a bit.
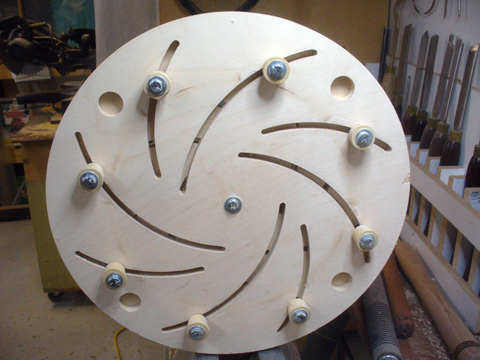
Then we reversed the front disk on the disk with the faceplate so that the arcs crossed each other and fitted a 1/4″ bolt with a nut, a locking nut and washers in the center hole.
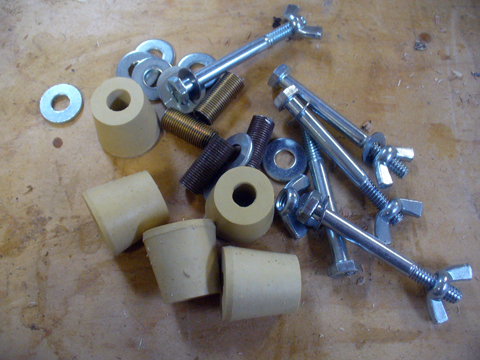
For the rubber ‘buttons’ we used Size #4 rubber stoppers used in wine making. They come with a hole already drilled in them. However, because the hole was a bit too large for the 1/4″ bolts we used cylinders made from threaded rod to make them smaller. We cut them a bit shorter than the stoppers to allow them to compress when tightened. These also gave more stability to the stopper. The stopper was also a bit too long so we sawed off about 3/8″. To tighten the bolts we used wing-nuts.
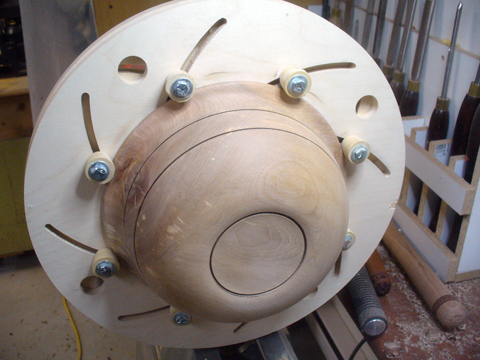
Once we had all the hardware added we put it on the lathe and it looked like this:
See, we told you that it was simple. 🙂 Seriously, it is a lot more simpler than it sounds.
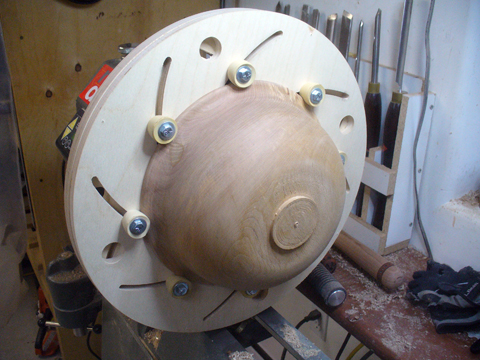
To use it we lay the chuck on a table with the faceplate down and lay my piece on it. Then using the finger holes we bring the buttons in, tightening on the piece. We will also use the tommy bars sometimes to tighten. Sometimes the bolts go askew and need to be jiggled or loosened to allow the disks to freely move against each other. Then we tighten the wing-nuts and follow this up with more tightening using a wrench when the chuck is mounted on the lathe. We found this process to be a bit cumbersome when we first started using it but it became easier each time we did. With the piece mounted it looks like this:
Because there are 4 arcs that don’t come as close to the center as the other 4 there is a limit to how small of a piece you can fit on. The solution is to remove those 4 bolt assemblies and just use it with the 4 buttons on the larger arcs. This isn’t a problem since a smaller piece will require less holding power. Another solution is to just make a smaller one with just 4 buttons. 🙂
Because of the size and weight of the chuck, and also because we are just using it to finish off a bottom of a piece we usually use it with a speed of between 500 and 600 rpms, though we have had it as high as 750 rpms.
For this project we used a 3/4“ thick piece of plywood for the back piece, the one with the faceplate, and 1/2“ thick piece for the front because this was the thicknesses that we had on hand. You can also use a combination of 5/8” and 1/4“ or even 3/4“ or 5/8“ for both. The larger that you are making one we expect that the thicker the better.
We also used Baltic birch plywood, again because this is what we had on hand. While Baltic birch ply is better you can use regular plywood or even MDF. If you use MDF we suggest that you bolt the faceplate on the back disk before screwing the disks together since MDF sometimes doesn’t hold screws as strong as plywood.
We believe that the Longworth is the cat’s meow. There’s no more time being wasted on removing jaws, adding the Cole jaws, removing buttons, adding buttons, realizing it’s the wrong size and doing this again. Just doing this takes a minimum of 16 steps, and 32 steps if you have to move the buttons! With an afternoon and some readily available and inexpensive parts this is all eliminated.
This particular chuck we made will take a maximum bowl size of 13 1/4“. We plan on making a couple of more, a smaller one with 4 buttons so that we don’t have to remove the bolts form the larger one and a much larger one to work on my outboard. To further cut the cost of making these we had access to a spindle tap and we made a couple of hardwood faceplates.
Here’s a few more websites that offer instructions on how to make the Longworth that you might find helpful:
http://www.woodworkersinstitute.com/page.asp?p=1417
http://www.morewoodturning.net/articles/longworth.php
http://woodcentral.com/cgi-bin/readarticle.pl?dir=turning&file=articles_485.shtml
http://www.scrollsaws.com/WoodLathe/woodlatheLongworth.htm
Also, the April 2010 issue of Woodturning magazine has an excellent tutorial which I followed pretty much verbatim.
If you make one let us know how you made out. 🙂
Back to the shop…
Brian welch
Could you please explain or show in better detail the process of joining the two together with the 1/4 bolts? How are they supposed to turn against each other if they are bolted together? Do you have to loosen this each time and tighten it back? Thanks for this article, it is really great!
Woodworker's Guide
Brian, you can use either a nylon thread locking nut on the 1/4″ bolt in the center or use two opposing nuts like I did. Just bring it snug so that the disks are somewhat tight but can still rotate them against each other.
Then, with the eight bolts on the arcs loose you can rotate the disks to get the desired width to fit your bowl, set your bowl in, rotate again to bring the buttons up tight to your bowl then tighten the eight bolts with the wingnuts.
Hope this helps…
Brian welch
Thanks for the fast response. To make sure I am clear, nothing goes between the two circles right? The 1/4 bolt goes through from the front with a washer and the locking nut, or two nuts go on the back with a washer. So basically the bolt just acts as an axle? Sorry if I am a little slow, I have never seen or used one of these chucks and I was wondering if the bolt in the middle was supposed to be free or tightened down each time.
Woodworker's Guide
Exactly! It works like an axle… great analogy… let me know how you make out with it…
JOSE
WHAT IS THE WIDTH OF THE ARCS CUT WITH THE ROUTER? 1/4″, 5/16″ OR 3/8″?
Woodworker's Guide
Jose, since I used 1/4″ bolts I used a 1/4″ router bit to cut the arcs. To give more movement after routering I gave the arcs a quick sand.
Neal
Out of curiosity, would the same principles used to create this size of longworth chuck be able to be used to create a much smaller chuck, something about 6-10″ in diameter? Also, would this style of chuck be any good for turning square objects i.e. a fresh piece of wood ready to turn? Very good article by the way, a little hidden gem in the midst of a google search for ‘homemade chuck’!
Woodworker's Guide
Neal, yes, definitely! In fact, I have built two of the 10 inchers, one for my son and one for myself. They work on the mini/midi lathes or if you are turning smaller items on a larger lathe and don’t want the large disk whirring around. The only difference I made was that for the 10 inch ones I only went with 4 buttons instead of the 8. As for square pieces of wood, although i never tried it i would say yeas, as long as you can get it centered properly. However, one thing to keep in mind is that these types of chucks are primarily used to finish the bottom of a project and not for any heavy turning. Thanks for the kind comment.
Darell
I’m curious, were you able to find completely flat material to make your chuck from? I made one but it turns out my BB plywood wasn’t completely flat and it wobbles just a bit. Has that been a problem for you? I plan to build another when time and appropriate material allow.
Woodworker's Guide
Darell, fortunately my Longworth runs true. Is your faceplate snugging up to the lathe properly? Faceplates and chucks must bottom out against the lathe to run true. Also, you may want to consider Medium Density Fiberboard (MDF) for your next one. It is quite flat (though I hate working with it).
Darell
My faceplates and chucks seat perfectly on my lathe. I had checked that to see if it might add to the warped plywood I used but it’s a good fit. Laying a straight edge across my chuck shows an almost 1/8″ bow in the plywood. I’ve got some MDF in the shop but unfortunately what I have isn’t flat either. Could be the way I’ve had it stored up against the wall. My chuck is usable but I’m very careful making sure to take very thin cuts. I like it well enough that I want a better one. A fellow turning club member is wanting to get together with me to build a couple Longworth chucks so maybe we’ll find some suitably flat material. I made mine from plans in the book “Fixtures & Chucks for Woodturning”. Very similar to yours in construction and design, the only difference being I’ve got 6 pins and you have 8. Very good work by the way.
Woodworker's Guide
Darell, yes, a 1/8″ bow will definitely cause a wobble. Sounds like a fun day to get together with a friend and make a couple of more. As you found out, they are fairly simple to make. Good luck with the new one. Let me know how you make out.
Paul Elshoff
Lovely job, mate! Got a couple of suggestions for you:
Sand and wax the disks on the sides that face each other for an easier adjusting.
If you want to use MDF for the flatness, try gluing a piece of thin BB ply to it to keep it from disintegrating at higher lathe speeds. 1/4 inch would do great and you get the best of both worlds.
Thanks for sharing.
Paul
Woodworker's Guide
Thanks, Paul, for the great tips!
matt stern
hi:
great article, thank you. i made one about 16″ and it generally works well, except for one problem. as i counter-rotate the two disks to either enlarge or reduce the diameter of the stoppers, it is very difficult to turn the two disks. i usually have to use one hand to try to move the disks in opposite directions, and the other hand goes to each of the 8 rubber stoppers and push them in the proper direction (against the force of the rotating disk). i checked, and the center bolt is not tight, but it’s still very difficult (and time consuming) to change diameters.
any suggestions?
thanks
Woodworker's Guide
Matt, I won’t admit that mine is a real smooth turn but I haven’t found it to be difficult. I believe the problem happens when the bolts for the stoppers go askew. I find that loosening the bolts helps. I also made sure they are smooth and I wax them. As well, I have drilled several holes into the very edge of the plywood and use a couple of Tommy bars. This works better that the ‘thumb’ holes because you can free up one hand by wedging one of the bars between you and the lathe.
Splinter
What was your plywood thickness? The arcs were routed in depth steps with 1/4″ router bit, but the shank length of the 1/4″ router bit is normally 1″ plus??
Woodworker's Guide
Splinter, for this project I used a 3/4“ thick piece of plywood for the back piece, the one with the faceplate, and 1/2“ thick piece for the front piece. The length of the 1/4″ spiral bit I used is 3″ long, made by Onsrud. Hope this helps!
Chidders
Really good article this, thanks for the advice and design etc. My friend and I made one this weekend and after a few hitches with the marking out it all went very well and works like a dream. This cost me about £10 in total and I will be able to finish the base of any bowl up to 18 inches. This would have cost £150 plus if I had bought the equivalent which I could not justify for the times I will use it. Instead I can buy more important items for my workshop. Such a simple idea! Wish I was clever enough to think of this sort of thing. Thanks again.
Woodworker's Guide
Awesome! Glad to hear it! Yes, Mr. Longworth certainly was a clever guy!
ROY ESSLINGER
This is a great project to build however its not as easy as you think. It takes a lot of patience and time to get it exactly right. The number 4 rubber stoppers are almost impossible to get so after several hours of running around wasting gas I found number 3’s that will work just as good. As far as the threaded rod used for the inside of the stopper thats OK but how are you going to drill a 1/4 inch hole in the center of a piece of threaded rod unless you have a lathe like I do to get it perfectly centered. I have a better idea but its late and I need some sleep so when I finish mine I will let you know what I do. As far as cost goes so far I have about $25.00 in all the materials including the faceplate. If I can improve the one I am making I plan on producing them out of Acrylic and will offer them for sale for around $65.00 to $100.00 and make them from 10 inch to 16 inch.
Woodworker's Guide
Roy, the threaded rod I refer to is the type used for lamps. It already has a hole through it. Also, as I referred to above, if you have access to a Bealle tap you can turn a faceplate and tap it instead of buying one. Better yet, if you turn a tenon on the faceplate you could simply chuck it instead of threading it on to the lathe’s spindle. This would make it work in any chuck. Hope this helps.
ROY ESSLINGER
I wish I would have known sooner about the lamp rod, thats a great idea. I spent over 2 hours on my metal lathe turning them from bolts however they are a perfect fit. turning the tenon sounds like a great idea and bring the cost down also. I also put nylon washers in the middle of each disk on the bolts and the center bolt and they seem to help make it turn with no friction hardly at all. The next one I am going to make will have nylon bushings in each slot to keep all bolts perfectly straight, that should really solve any issues of turning. Thanks for the information on the lamp rod.
Dave mack
I just finished and tested the chuck. It took about 2 afternoons and cost maybe $10 and works great. I used 1/2″mdf. I used a 1/2″ dowl piece in the center for the axel and auto heater hose for the rubber parts. The hose had a 7/16″ ID so i drilled a 1/4″ hole in some short pieces of 7/16 dowel rod to accomodate that. I put some paste wax in the routed grooves and it rotates very smoothly. Thanks for the great plans.
Woodworker's Guide
Awesome, Dave! Great adaptations! Thanks for sharing.
Robert Rodinsky
I just finished building an 8″ diameter chuck with 4 buttons. I too had a little bit of a wobble from the piece of plywood i used. I had no problem truing it up on my lathe. Looking forward to using it
Russ Bolton
I have acquired some Coreian countertop removed from a house that was being remodeled. It turned out real good and is dead flat and runs true. It can be cut and worked with standard woodworking tools.
I used plastic wine corks for mine, I do like the idea of the tapered ones that he used they might hold more secure. I used the wine corks full size and stretch a heavy rubber band over the top to tilt them in a little . The good part of using corks is you get to drink eight bottles of wine.
I also used a 1/4-20 bolt for the center. I did not use a nut on this but drilled and taped the Coreian. I had to redo it when I tried to put a flat shallow dish on it. Instead use a flat head 1/4-20 and countersink so it is slightly below the surface so it won’t interfere with clamping something flat. I also made bushings for the rubber jaw and center bolts from brass similar to the brass tubes used in pen kits (got it from Ace hardware).
Maurice Byrne
Great explanation and drawings, many thanks – looking forward to making one tomorrow !!
For this first one I’m going with the BB ply but intend to try 6/8mm sheet Tufnol for the second one. This material is manufactured dead flat and stable and I hope will provide smooth, almost frictionless, rotation of the discs. Anyone tried this?