
The problem with cutting 45 degree angles is that if your table saw is out of alignment by any amount you will not get a perfect 45. This may not be noticeable when putting only two pieces of wood together but when you have to make a square with 4 pieces you’ll find that there will be undesirable gaps at the miters. A 45 degree cutting miter jig, or as I call it – The Perfect Picture Framer Jig, will eliminate this problem.
Here is a top view of this simple jig:

And this is looking towards the front (where you stand) of the saw:
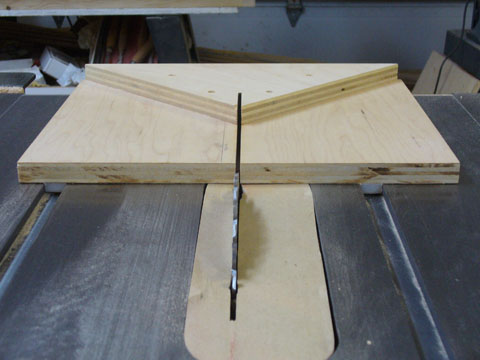
As you can see, it is just two pieces of plywood screwed together with two rails that slide in the miter slots of your saw.
The bottom piece of plywood can be of any size as long as it spans the miter slots. The top piece is cut with a perfect 90 degrees and screwed to the bottom piece with the point aligned, by way of the rails, with the center of the saw blade.
Things to keep in mind:
1. Ensure that you create a perfect 90 degree angle on the top piece of plywood. This is very important.
2. Try to get the point of the 90 degrees to line up with the center of your saw blade as best you can. If this is not perfect don’t worry about it but get a near as possible.
3. Ensure that the jig slides freely forward and backwards in the miter slots but NOT from side to side. This can be done by creating the rails with as near to the slot width you can without them sticking. I used UHMW polyethylene strips but hardwood strips would work as well.
Once the jig is created the trick to getting the perfect miter is the fact that you cut one end of a frame leg on the left side of the 90 and mark it as ‘#1’ and then cut the other end of the same frame leg on the right side of the 90 and mark it as ‘#2’. Do this for all four frame legs. Then put the #1’s and the #2’s together. They should fit perfectly.
The jig works on the theory that as long as you as you cut as above, when you put them together the angle will add up to a perfect 90 degrees. So even if the point of the 90 is not perfectly centered, or your blade is off a bit it still works. For example, if your #1 cut is at 47 degrees your #2 cut, on the other side of the 90, will be at 43 degrees, adding up to a perfect 90. Cool, huh? 🙂
If you are going to do a lot of repetitive work I would add a fence to the sides of the top piece that would allow you to clamp a stop block for quick sizing.
Once the frame pieces are cut it’s just a matter of gluing and clamping them together to make a ‘perfect picture frame’!
Back to the shop…
Tony
haven’t tried it yet but will looks like you made ahard job easy
Fred L. Anderson
This jig is the best idea since sliced bread. Thank you for posting it and allowing me to utilize it. If you’d care to add to this the fact that it fits perfectly on a “GOOD MITER SAW”. It is much safer and doesn’t need the guide rails that are required for the table saw. The cuts are as near perfect as can be made. Thank you once again for your advice.
Woodworker's Guide
Hey, Fred, that’s great! Thanks for sharing!
James Westbrook
If I’m unable to create a perfect 90 degree cut for picture frame, how can I conform to number 1. Ensure that you create a perfect 90 degree angle on the top piece of plywood. This is very important. Rookie wood worker.
Woodworker's Guide
James, yes, accuracy is very important in this project, as with all other woodworking projects. The more accurate you are at each step the better your project will be overall, in both ease of construction and appearance. In this case, the closer that you can ensure a 90 degree corner the better your picture frames will look. The easiest way that I have found to achieve a 90 degree corner is to use a table saw with a fence. I lock the fence at a distance relative to the size of the jig I wish to make and then cut a square from a piece of plywood. I ensure that I start cutting with a flat side against the fence. Then, once I have the square piece of plywood I cut it from one corner to an opposite corner. I use a jigsaw or bandsaw for this step since this cut doesn’t have to be all that accurate, and I don’t want to have to build another jig to do it on the tablesaw safely. This gives me two triangles but I only need one of them per jig) I use the corner that was cut on the table saw for the point of the jig. Since my fence is square to the blade the corner should be 90 degrees. This, like other tutorials, may sound a bit confusing and daunting since it is very hard to explain every small detail. However, if one takes the time to think it through, takes all necessary safety precautions and ensures accuracy at every step one can achieve any project’s goals. Hope this helps!