
This was a very straight forward process that created a quality product at relatively low cost.
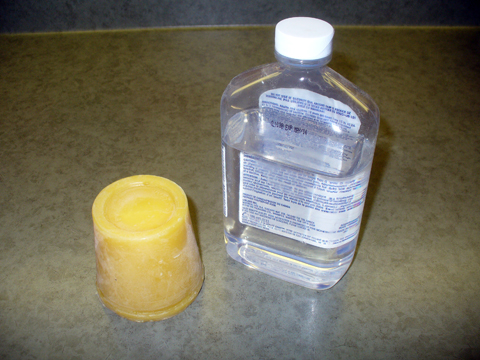
We purchased the mineral oil at the grocery store in the pharmacy section and we got the beeswax from a local honey maker. The total cost for both was under $3.00 giving a cost per ounce at roughly .24 cents. This is 1/10 of the cost for similar commercial products!
The recipe that we used is simple and it took less than 15 minutes to make it.
Here’s the recipe that I used:
Ingredients:
1.5 cups (355 ml) mineral oil
2.5 ounces (71 g) beeswax
Preparation:
Use a tall metal container or can and pour the mineral oil into it and add the beeswax. Melt over a low heat source just until the beeswax has completely dissolved (please see tips and comments below for suggestions), stirring as it melts. Once the mixture is blended, remove from heat. Allow to cool for a couple minutes so that it’s not too hot for the glass jars, then pour into the glass jars and allow to finish cooling completely. Add the lid, label it, then store in a cool location.
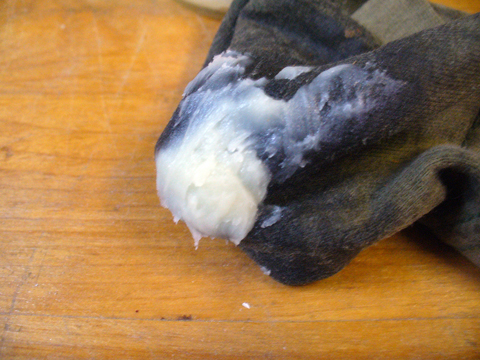
These ingredient amounts resulted in a wax that though solid when cooled was soft and smooth. You can vary the amount of beeswax to give you either a softer or harder wax.
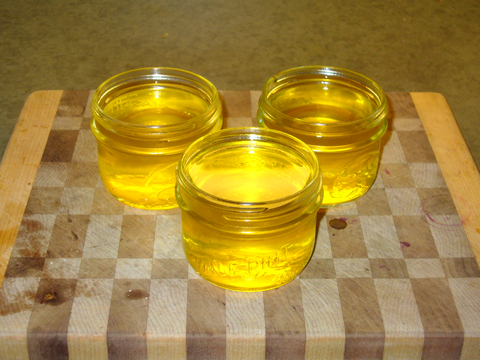
We used the smaller (4 oz.) size Mason jars because they are short with a wide mouth, allowing me to access right to the bottom. This recipe yields around 16 oz. and requires 4 of these jars.
Be careful when heating and blending the oil and beeswax, especially if using an open flame!
As you can see, there’s not much to it. 🙂
Here’s some more photos beginning with the ingredients:
Here’s the blended oil and wax cooling:
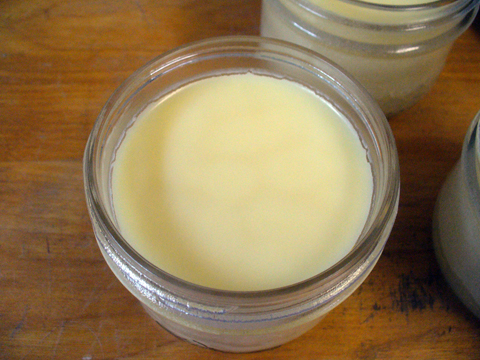
A closeup of the wax:
This one shows the soft, smooth texture of the wax:
With a few simple ingredients and a few minutes we got enough beeswax finish to last us for quite some time, and all for under 3 bucks! 🙂
Update: Since making this recipe we have I also made others by adding more amounts of mineral oil. By adding more mineral oil the finished product becomes a softer paste, which we like for other applications. Start with the above recipe and then experiment to get the consistency that you are looking for. You can always reheat and add more mineral oil until you get it right. 🙂
We also spoke with several people that use a microwave oven for melting the wax and blending. Although we haven’t tried it yet it sounds to be a lot safer than doing this over an open heat source.
Back to the shop…
Bob
Great post. Remember if you are going to use this on cutting boards like the one pictured, both the mineral oil and bee’s wax need to be food grade. Baby oil has fragrance added and some commercial bee’s wax can have contaminants (not a problem for your locally sourced bee’s wax).
Woodworker's Guide
Good point, Bob, thanks!
willy
do you think i can use this finish for the teethers?
Woodworker's Guide
I would say yes. Keep in mind the tips that Bob mentioned above.
Tilly
I make the beeswax/mineral oil paste for my hubby and I put the tin can into a small pot of water on the stove top. That way I can stir, I use a chopstick,while it is melting and the pot of water prevents any possibility of the wax catching on fire. I have also squeezed the tin into a sort of spout which makes pouring oh so easy.
I have not tried the microwave because I like to be able to see what I am “cooking”, but I write this as I was shocked that some people may put the tin with wax and oil directly on a stove,either electric or open flame. NOT a good idea EVER!
Woodworker's Guide
Tilly, thanks so much for the great tip! You’re right that this should never be done over an open flame.
Kerri
Thanks for all the great tips. I too did mine in a can in a pot of water. Works great! I wondered how many coats or is it just one that gets applied, my hubby made a butcher block. Thank you
Woodworker's Guide
Kerri, this is what works for us – for butcher blocks and boards we usually start with several of coats of just mineral oil, letting them dry in between. Then we’ll do a coat of the beeswax/oil mixture and buff it well when it’s dry. From then on we then apply the beeswax/oil as needed.
Lynn Reid
Hi…I think you have the formula wrong. That consistency would require 2 cups of mineral oil to 2.5 oz of beeswax. I made it using the above formula and came out with a very hard wax…which serves its purpose too. Just FYI.
Woodworker's Guide
Lynn, I’m not quite sure what you mean by “that consistency” but, as I said above, experiment to get the consistency that you want. If it is too hard to your liking simply reheat and add more oil or if too soft add more beeswax. Likewise, you can soften hard wax by lightly heating it in a microwave for a few seconds.
Carole M
I made this finish this afternoon, let it cool, and rubbed it onto one of my new unfinished maple veneer bookcases. It worked great, and I’m looking forward to adding more layers!
Woodworker's Guide
Carole, glad to hear that it’s working for you!
George
Thank you for the recipe! How much oil do you use now for the softer consistency, in reference to your update? I’ll be experimenting too, but I’m curious as to how much it varies from your original recipe.
Robbie Laws
I used your template and made a soft wax using 3/4 C mineral oil and 1oz of beeswax. It brought back my cabinet doors and I love the satin shine. Thank you!
Scott Walton
Question… your recipe sounds good and I love the look of a beeswax finish! Have you tried adding carnuba wax for a slightly higher shine?
You can get granulated carnuba wax @ a decent art supply.
Robyn Schulze
Thanks for this article. Here are a few points to consider: As Bob mentioned at the top, beeswax sold commercially is going to be contaminated with chemicals, so finding it from a small, naturally-oriented beekeeper is your best bet. I keep bees, don’t use chemical miticides in my beehives, so my wax is about as clean as you could find. Also, regarding handling wax, I would NOT put it in the microwave. Beeswax has a very low flashpoint, so melting it in a double-boiler is the safest way. Next best would be as you suggest, to melt it with the mineral oil on a low temp on the stove, and watch it carefully.
david glass
so i did it in the microwave and it worked great. it took 6 1/2 minutes pausing to stir twice.
do you only use one coat? if i was oiling a prodject i might use as many as 3 coats.
your thoughts please
Bryant Woodworking
Add some about 15 drops of Lemon essential oil for a nice fragrance and disinfectant.
Terry742
I have been woodworking for over 30 years and I think I will try it with Boiled Linseed Oil instead of mineral oil? I wonder how it much easier staining would be mixing the beeswax with an oil base stain. This gives me allot to think about, Wow! Hey, Past Wax melts! HHMMM ?????????
Jay
Great recipe. I use this on cutting boards that I gift and wood spoons. Tried the microwave with poor results. It does not allow the time at temperature needed to melt the beeswax. Plus the high oil temp can cause overheat of your microwave. Luckily mine reset after an hour. A steady temp on my gas stove melts the beeswax slowly. Frequent stirring gives you that creamy texture.
Jay
Oh and for you engineer educated woodworkers (like me) you want the oil at approximately 144F to melt the beeswax. The golden color is the marker but so is a good thermometer.
Katie F
Does this mixture dry? I’m looking for a natural finish that doesn’t contain nuts for wooden bowties……
Val
Terry742, be very careful about using boiled linseed oil, it is toxic and not recommended for cutting boards or cooking/eating utensils. It’s great on non-food surfaces but should never be used on any surface where food preparation will be done.
Don
Be careful with using linseed oil. Untreated linseed oil dries extremely slowly and tends to stay wet. Linseed oil that does dry can have metallic salts added as dryers, but you wouldn’t want to accidently ingest the additives.
Melody
I make this for my husband’s kitchen wood products…I wanted to suggest that using a crockpot is very effective and safe. I have a small one ($8.00 at your local store) that is great for this project.
Ian
Thanks for your recipe. I made this the other day. Couldn’t justify paying $10 for 4oz at my local home hardware. I have a large island in my kitchen that is butchers-block. I didn’t know it needed conditioning. Noticed it was starting to dry out where it gets wiped off a lot from food prep. Did some googling and now I’m a happy husband!
Thank you!
Pat
I get my mineral oil at the feed store. Amazon is $22.00 for a gal. or local feed stores.
Ginevra da Cunha
I am going to do a demonstration of making this product for my historical group. I have made it many times and thought it was time to share. We use a lot of wooden utensils, etc. and this finish is wonderful. My question is this: does anyone have a history of this product? I need documentation if I can find any. Suggestions?